Integrating Saber Feedback with Jira
With our Jira integration, Saber Feedback will create a Jira issue for each feedback report you receive via your Saber Feedback button.
To do this, navigate to Jira Administration > System > Advanced > Attachments in your Jira dashboard, and set Allow Attachments to On
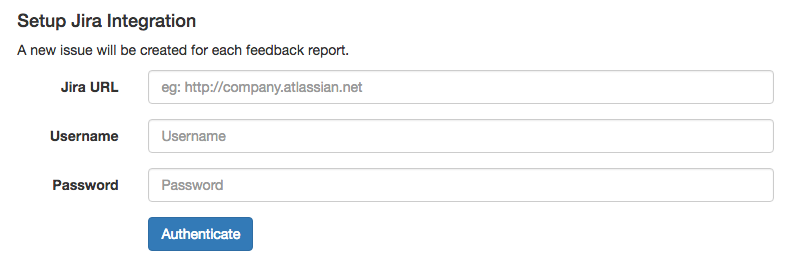
Jira Integration is a 2 stage process, first you need to enter the following information to authenticate your Jira account:

Jira URL
Required
This is the entire URL to your Jira Application, including the http:// or https:// at the beginning. If you’re using Jira Cloud, this URL will end with .atlassian.net
Be sure to include the port number if you’re not using the default http ports. Eg: https://jira.mycompany.com:8080
Username
Required
Enter the username you log in with.
Password
Required
This is the password associated with the username specified above. It’s recommended that you create a new user in Jira, and use their login details for Saber Feedback integration.
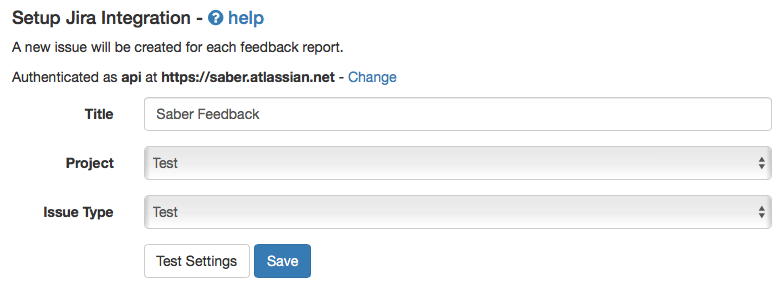
Once you’ve filled in all three fields, click the Authenticate button. Assuming the details you provided were correct, you should be taken to stage 2:

Title
Required
This allows you to define the title of issues submitted through Saber Feedback. If the title contains {{summary}}, this will be replaced with a summary of the feedback reports description.
Project
Required
This is a drop down list of projects, retrieved from your Jira account. Simply select the project in to which you’d like Saber Feedback to create new issues.
Issue Type
Required
This is a drop down list of issue types, retrieved from your Jira account for the specified project. Simply select the issue type you’d like Saber Feedback to create. Note this field will not be visible until you’ve chosen a project.
Test Settings
All integrations include a test button, which allow you to check the options you’ve specified are working correctly. Clicking the Test Settings button will send a sample feedback report using the data from the form to your Jira account.
Clicking test settings does not save the integration, you will still need to click the Save once you are happy with settings.